Article
Launching a Flicka from a Trailer
By Mike Nelson
Photos and Text © 1998-2007 Mike Nelson
When my co-captain and I were looking for a replacement boat, trailerability was of interest to us. We talked to several Flicka owners about launching from a trailer, and found that only a few thought it was very easy. Since then we bought Eventide (Hull # 356), and have launched her several times from a trailer.
We use a launching method that is quite effective, and wanted to share it with other Flicka owners. Pete Wakefield in New Mexico suggested the original idea for this method to us.
The challenge with launching or retrieving the Flicka from a trailer is to get the trailer deep enough so that the boat will float off or on easily. On our trailer, the boat's waterline is five feet from the ground over the trailer wheels. That means the boat will float off our trailer only when the trailer wheels are quite a bit underwater.
First, 30 to 40 feet of chain is a real pain to handle. We found some synthetic tow strap material in a local farm store that was rated at 15,000 pounds. We found a high load capacity fixed caster with a 12 inch pneumatic tire that is easily mounted on the trailer tongue in the same farm store.
1. Check Water Depth
Ensure that their are no obstructions in the water around the ramp, the water's bottom is hard enough to support the load, there is enough water to retrieve the boat safely.
Figure 1. - the heavy-duty caster lowered and ready for use.
2. Prepare Trailer
Back the trailer down to the water, chock the wheels, and lower the jack with the caster.
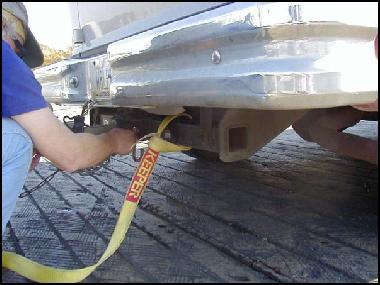
Figure 2a. - attaching tow strap to the truck's tow bar.
3. Attach one end of the tow strap to the trailer, one end to the tow hitch on the vehicle, then detach the trailer.
Warning: A frayed, chaffed or worn tow strap should not be used.
4. Drive the tow vehicle forward until the tow strap is taut.

Figure 3. showing trailer ready to be rolled into the water.
5. Check that no one is behind the trailer or the vehicle.
6. Remove the chocks and then back the trailer into the water until it is close to the boat.

7. Attach the trailer winch strap to the eye on the bow of the boat, and winch it onto the trailer.
8. Pull the boat and trailer out of the water.
9. As before, chock the trailer, back the vehicle down to the trailer, and reattach the trailer to it.
We've had success with this method both locally, in the North Channel, and on the Chesapeake. It is cheaper than paying for a hoist, assuming one is available.
Mike Nelson, S/V Eventide. Photos and Text - © Copyright 1998, 2000, 2001 Mike Nelson
Warnings: This information is provided in good faith but because launching and retrieving a boat is subject to so many variables, no warranty is made. Consult with a marine professional. The caster's load rating (800 lb.) was determined based on Eventide's total loaded weight and the weight of her trailer.